Pages

Monday, March 28, 2011

squash and potato pizza (with an optional sprinkle of bacon)

Next time you have some squash (maybe from your winter CSA) sitting around malingering, and you don't have anything in mind to do with them and don't feel like eating it right away, you can roast them up and store them in the fridge or freezer, till you're ready to try this, a pizza where mashed squash replaces tomato sauce, and potatoes join the ranks of whatever cheese you have in the house. Any kind of winter squash will work - it was a butternut squash in this case, acorn squash would work too. You could probably use about 2 pounds worth on a large pizza, but you can make do with any amount you might happen to have around.

Amounts on everything are intentionally vague because really any amount of anything here can be made to work.

Squash and Potato Pizza

a batch of your favorite pizza dough (you could use that kind they sell in a bag at the store)
winter squash (1 big, or 2 small)
chopped garlic
chopped parsley
chopped fresh rosemary
salt and pepper
par-cooked* whole small waxy potatoes, sliced thin
extra virgin olive oil
cheese of practically any variety you have on hand (a total of about 2-3 cups shredded will make a nice cheesy layer; cheddar is a great match for the potatoes, ricotta would be fun, and parmigiano would be great for crisping up on the very top)
scallions, sliced
bacon, crumbled (optional)**

Roast the squash in whatever way you prefer (I like a 400 degree oven for an hour, cutting the squash in half, removing the seeds and lightly oiling the cut side before roasting. Our friend Jeremy roasts acorn squash entirely whole until soft, just on a sheet pan, and cuts in and removes the seeds after they're all cooled down, which I suspect imparts an extra squashy flavor and moist texture); this squash-roasting can be done well ahead of time and refrigerated, just be sure to get your squash to room temp or warmer to put on the pizza. After removing the peel (skin?) of the squash, break it down into chunks and place in a bowl. Add garlic, parsley, rosemary, salt and pepper and some extra virgin olive oil, and mash around until it has a sort of paste-like consistency.
In another bowl, toss the sliced potatoes with some olive oil and salt and pepper.

Grate or crumble your cheeses. As you can see, I was using this opportunity to use up the alarming hoards of bits of cheese in our cheese drawer.
We had bits of cheddar, taleggio, queso blanco, gruyere, parmigiano and romano. I used most of the cheese you see here, on this and one other pizza I'm not telling you about (it's not a secret or anything, it's just no big deal, tomato sauce, etc).

Roll or press out your dough onto the oiled pan of your choice - I've been using an 11x17 sheet pan for pizza lately. Oil it generously before fitting the dough in there or it'll stick when you bake it and you'll feel sad. If you have trouble with the dough shrinking back, leave the dough for 20 minutes to rest (if you can) and then it should be more cooperative.

Drizzle a little olive oil onto the dough and then spread on the squash in an even layer. Lay out the sliced potatoes over the whole surface, and sprinkle on your cheeses.
Let the pizza sit in a warm place, like on top of your preheating oven, to allow the dough to rise, about 20 minutes.

Bake at 450 for 15-20 minutes, until the cheeses are all melted and the crust is nice and golden brown. When you get it out of the oven, sprinkle on the sliced scallions and the bacon, if you want it, and then let the pizza cool briefly before slicing it up and eating it.
This was delicious leftover. Actually I ate cold pieces of it for lunch the next few days and it was awesome.

*For quick par-cooking to speed up things like this (or for home fries) I like to wash potatoes and pop them whole into the microwave for 2-3 minutes until they give a little when pressed.

**What I actually had was some leftover bacon wrapped (pecan stuffed) dates from a party, which I chopped up and put on there. While bacon wrapped dates stuffed with pecans are over the top delicious on their own, the pizza would also have been great with regular chopped crispy bacon, or actually no bacon at all would really have also been good, and that way I could have shared it with my vegetarian friends.

Monday, March 21, 2011

The most work intensive cookies I've ever made


Many times on this blog we find ourselves writing "this is so easy and fast" as a reason why you should try to one recipe or another. What I am about to share with you is neither easy nor fast. It will take you a lot of time. Possibly several or 5 hours. It isn't that easy (although I guess once you get the hang of it, its definitely not brain surgery). I had to read the instructions 5 times and I still didn't understand what was going on. Thank goodness our friend Jess (who orchestrated this cookie adventure) is smart, because I definitely wasn't going to figure it out.

These cookies are beautiful once baked and totally impressive. They are a pretty simple shortbread cookie but the addition of hazelnuts and orange zest make their flavor something special, to match their beautiful appearance. I'm proud that we made these - I generally think of myself as a good baker, but I'm not that great at intricate desserts. Those cake pop things? Forget it. Beautifully decorated cupcakes? Well....mine TASTE good. But, successfully making these cookies give me hope that I'll be able to tackle my next aspiration - macarons. I'll let you know how it works out (obvy).

We found the recipe here, but decided to double it. Our measurements are below, for a single batch, see the original.

Checkerboard Cookies
from Joyofbaking.com

Ingredients:
2/3 cup hazelnuts
4 tablespoons unsweetened cocoa powder - Jess had Valrhona, because she's fancy
5 cups flour
1/4 tsp salt
2 cups butter at room temperature - Jess had Plugra, again, fancy
1 1/2 cups sugar
2 eggs
3 tsp vanilla extract
3 tsp orange zest - we used the zest of one orange and we definitely wish we had used more, at least the zest of 2 oranges

Toast your hazelnuts in a 350 degree oven for about 15 minutes, or until you start to smell them. Don't burn them! (You always have to say that when toasting nuts, its so easy to forget about them.) Wrap them in a towel, then rub them to get the skins off. Combine the skinned hazelnuts and cocoa powder in a food processor and process until the nuts are finely ground.

Mix together flour and salt and set aside.

Using a stand mixer or hand mixer, cream together the butter and sugar until light and fluffy, about 2-3 minutes. Add the eggs, vanilla and orange zest and mix. Add the flour mixture and beat until just incorporated, don't over-mix. Divide the dough in half and mix one half of the dough with the cocoa/hazelnut mixture in the bowl of your mixer until incorporated. Now you have your two colors of dough ready. Gird your loins, because from here on out its a lot of measuring and rolling and chilling your dough. Oh, and don't even try to do this without parchment paper. It won't work.

Lay out parchment paper and roll out the vanilla dough to two 6 1/2" x 10 1/2" rectangles. Or one 6 1/2" x 21" rectangle. Either one. Or, if you're not doubling it, just do one smaller rectangle. I trust you to figure it out. Wrap in the parchment and put in the freezer to chill for about 15 minutes.

Remove about 1 cup of chocolate dough and set aside. This is what you will use to wrap the entire thing and create that pretty chocolate border you see around the edges of the cookies above. On another sheet of parchment paper, roll out the remaining chocolate dough to two more 6 1/2" x 10 1/2" rectangles. Wrap and put in freezer to chill.


Once the dough is firm, take the out of the freezer. Lay the vanilla dough on the counter, brush with water and lay the chocolate dough directly on top of the vanilla dough. In some fantasy world, these two layers of dough will be exactly them same size. In real life, you will have to trim the edges and square of the corners - you should have a final rectangle of 6" x 10" (yes, we did measure, a lot). Add all your trimmings to the reserved chocolate dough.


Cut this stack of dough into thirds, lengthwise. Stack these strips so that the colors alternate, brown, white, brown, white and so on (above). Press down to get the layers to meld together. Wrap in plastic wrap and put in the freezer until firm, about 15 minutes.


Once the stack is firm, cut it into four slices, lengthwise, about 1/2" wide. Turn every other strip so that you again have alternating colors (above). Re-wrap and pop back in the freezer for another 15 minutes or so.


While those firm up, take your chocolate trimmings and roll out into a rectangle about 9 1/2 x 10 1/2. Put in the freezer to firm (surprise!!). Once firm, remove the stack of dough and chocolate sheet from the freezer. Carefully wrap the stack with the chocolate dough. Smooth out and trim any extra from around the edges. You will have to do some cajoling to get all of this to go down correctly, but don't worry, just keep at it and you'll do fine. All the time in the freezer is really your friend as you can mold the dough to do what you want and then pop it in the freezer to solidify the shape. Once you've wrapped the chocolate dough around the stack, wrap again and put back in the freezer for another 15 minutes or until firm.


Preheat your oven to 350 degrees. Remove the dough from the freezer, unwrap and slice (with a very sharp knife, may I add) into 1/4 inch slices. Slicing these suckers was the easiest part of the day. Put on a baking sheet and bake for 5-8 minutes until slightly brown around the edges. Cool on a wire rack. Then, decide if you want to shovel all that hard work down your gullet or just stare at how pretty they are and marvel at the fact that you just made those!! I say, eat them!


Sunday, March 20, 2011

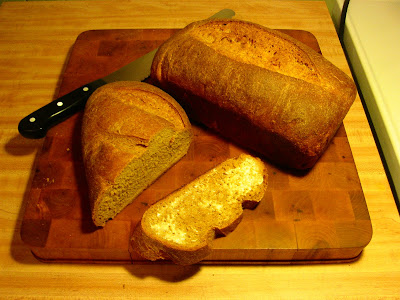
Oatmeal Molasses Bread


This is a very slightly modified version of the Oatmeal Molasses Bread in the Joy of Cooking (the updated one from the late 90s). I just wanted it a little softer so I subbed in some milk and an egg where the original uses only water.

total prep/rise/bake time: 4 1/2 to 5 hours (mostly hands off rising time)
makes 2 loaves (or a lot of rolls, if you want)

Combine and allow to come to room temperature:
1/2 c milk
1/3 c molasses
1 egg

In a medium saucepan, combine:
1 1/4 c oatmeal
1 3/4 c water
1 tbsp butter
3/4 tsp salt

bring to a boil, and cook on low for about 20 minutes until it's super thick and dense. Get it out of the pan, and onto a plate to cool to about 115 degrees (if you don't have an instant read thermometer, 115 feels just pleasantly warm, not hot). Incidentally, if you ever have about 2 cups of leftover cooked oatmeal (it might happen...), you could just use that, adding the melted butter and salt separately.

In the bowl of a stand mixer, combine:
2 tbsp room temperature sourdough starter (optional)
1/4 c warm (115 degree) water
2 tsp yeast (if you don't use any starter, use 2 1/2 tsp yeast total)

let it stand for 5-10 minutes, till it's bubbly. When the oatmeal is cool enough to touch (115 degrees), add it, along with the milk/molasses/egg mixture to the yeast/starter mixture and combine thoroughly. Add:

2 c bread flour
2 c whole wheat flour

Using the dough hook, mix on low until thoroughly combined (or stir with a spoon by hand until it mostly comes together and then turn it out onto a board to continue kneading). Continue to add up to 1 extra cup of flour, until you have a dough that's moist but not sticky. If you're using a mixer, let it knead the dough for 10-15 minutes. I would recommend pulling it out to knead in a bit more flour on your countertop to make sure the dough is cohesive.

Plop the dough into an oiled bowl, turning it to coat it all over with oil, cover the bowl with plastic wrap and put it somewhere warm to rise, 1 to 1 1/2 hours, until doubled (I put it on my radiator). Punch down the dough (or just sort of knead the air out of it, really) and divide the dough into two pieces (at this point I cut out an extra 30 minutes of "resting" time and saw no ill effects... if you have a lot of time on your hands you can add that in here).

Now you have a couple of options for forming the loaves. The original recipe is for two 8 1/2 by 4 1/2 bread pans, which you could do; but I only have one 9 by 5 bread pan - so instead of dividing the dough in equal halves, I separated it 2/3 (for the 9 by 5 pan) and 1/3 (for a free form loaf I baked on a sheet pan) (by the way I totally recommend getting a scale so you can weigh out your dough, mine was only about $15 and I use it all the time for baking and it's great); however you divide it, if you use loaf pans, grease them up really throughly, and if you want to make free form loaves, bake them on parchment lined (or cornmeal sprinkled) sheet pans.

Shape the loaves (I did a batard for my free form one, which is like a big fat baguette); put them in/on the pans, cover with plastic wrap and let rise in a warm place (on top of your preheating oven, for example) again until doubled, 1 to 1 1/2 hours.

During the rising time, preheat your oven to 375. Bake the loaves for about 40 minutes, or until they're deep golden brown, and they sound hollow when you tap them on the bottom.

Cool on a rack for about 30 minutes before cutting into it, if you can stand to wait that long. Actually we couldn't stand to wait that long, and it was fine. In fact, it was awesome, because the butter totally melted right onto that delicious hot bread and it was soooo goooooooooood.


Very special thanks to my crack team of photographers and lighting experts, who put in a lot of work at 2 in the morning to make these photos happen - big ups, Reba, Josh and Axel F!

Tuesday, March 15, 2011

Kale and Sausage Fry


This is a quick and easy (and very filling and satisfying) wintery dinner.

Kale and Sausage Fry
serves 4

8 small waxy-type potatoes, scrubbed clean, skins left on
olive oil
4-6 sweet or hot italian pork sausage,* whole
2-3 cloves of garlic, peeled, crushed and chopped
crushed red pepper
2 lbs kale, washed, stemmed and chopped
1 cup stock (any kind) or water
salt and pepper


Pre-cook the potatoes, either for 3 minutes in the microwave, or by parboiling (whole) in plenty of water, until just barely tender. Cut into quarters and set aside.

In a large heavy bottomed frying pan, heat some olive oil and add the sausages, turning occasionally to brown them nice and dark on all sides (don't worry about cooking them all the way through right now). Remove them to a plate.

Add a little more oil to the pan if it looks dry (if you have nice pork-fatty sausages this might not be necessary, but you want a fair amount of fat in the pan, a tbsp or so) and then add the potato chunks - leave them with one of their cut sides down until it gets some golden color, then toss them around and let them brown a little more, seasoning with salt and pepper. Remove them to the plate with the sausages.

Add a little more oil to the pan, turn the heat up to high and then add the garlic and crushed red pepper flakes. Fry briefly until the garlic becomes fragrant, and then add the chopped kale. Salt and pepper generously to taste, and toss it all around until the kale darkens and starts to wilt down. Add the cup of stock or water (eyeball it, add more if you think it needs it), add back the sausage and potatoes, stir it all up (scraping up any brown bits from the bottom of the pan) and cover.

Let it cook over medium heat for 5-7 minutes, until the kale is tender and the sausages are cooked through** and the potatoes fall easily back to the pan when you pierce them with a knife and attempt to lift them. Uncover and turn the heat up to high to cook off any remaining stock or water.

Serve with a drizzle of sriracha if desired. It could also be really good with some parmigiano grated on top, or some toasted breadcrumbs for crunch.


*We had some beautiful italian sausages from our meat CSA that were quite large (no comment) and one was plenty for each of us. I've noticed that supermarket italian sausages seem to be about half the size of ours, and you might want more than one per person, depending on your appetite and the appetites of your dining companions. Of course you can use any kind of sausage here - linguica would be intense but yummy (maybe fewer than one per person in that case), Trader Joe's makes a really delicious turkey kielbasa that would be good, brats would be fun, if you like them, etc. Even veggie sausages would work, I've had a fake italian sausage that was actually quite delicious considering it lacked pork.

**I just check to see if they're done by cutting into one. Not very scientific. If you opt for a precooked sausage like linguica, kielbasa or vegetarian sausage, wait to add the sausages till the very end - just add the potatoes at this point, and cover to cook them through, then add the sausage to re-warm as you cook off the stock.


Thursday, March 10, 2011

Roasted Cauliflower with Parmesan, Nuts and Parsley

I went to Via Matta, an Italian restaurant here in Boston on Saturday night and had some really delicious cauliflower. Really delicious CAULIFLOWER, you ask? Yes, really, really delicious. It was roasted and encrusted in parmesan and it was delightful. Today I realized I had a cauliflower languishing the refrigerator and what better way to use it than to try to reproduce Via Matta's version. I would say that I almost succeeded, mine wasn't quite right, but it was very good - theirs had breadcrumbs, I didn't have any bread so I improvised with some ground nuts. Here's how I did it...

Ingredients:
1 head cauliflower
1/2 cup nuts (I used a combo of walnuts and pecans, but I imagine almonds would be perfect)
2 cloves garlic
Olive oil
1/2 cup grated parmesan cheese
1/4 cup chopped parsley
s&p

Pre-heat oven to 350. Break down your cauliflower - easiest way to do it? Just slice the entire head into 1" slices and from there you can remove the core and cut the florets into smaller pieces if you want. Put the cauliflower on a baking sheet, drizzle with olive oil and season with salt and pepper and place in your pre-heated oven for 25 minutes. At the 25 minute mark raise your heat to 400 and roast for an additional 10 minutes until the cauliflower is cooked through and a beautiful golden brown. Grate about 1/4 cup of parmesan cheese over the cauliflower and return to the oven for just a few minutes to let the cheese melt.

While the cauliflower cooks, combine nuts and garlic in a food processor until the mixture resembles bread crumbs. See what I did there? FAKE breadcrumbs. Heat a few tablespoons of olive oil in a small pan and add your nut/garlic mixture to toast the nuts and cook the garlic. Remove from the heat and add the remaining 1/4 cup of parmesan cheese.

When the cauliflower is cooked through, transfer it to your serving dish and top with garlicky nut "breadcrumbs" and chopped parsley. Easy and delicious.

Note: I ended up with quite a bit extra nut mixture, so, super! I have it for later. But, either feel free to use it all, or make less, whichever you prefer.