Pages

Wednesday, February 15, 2012

butter-roasted butternut squash, quiche, and fast fake aioli

I have to share with you this insanely delicious, absurdly simple way to cook winter squash.  Once again what I'm giving you is a recipe adapted from a Mark Bittman recipe (he calls it Roasted Winter Squash Slices), and I'm sure you get it by now - Bittman makes great, simple recipes we should all cook all the time... but I feel the need to share this in particular because the recipe says "oil or melted butter" and if you're anything like me, you usually opt for oil when given the choice between the two, especially for oven roasting.  But I'm here to say, forget the oil for once, TRY THE BUTTER!  It is COMPLETELY different from roasting in olive oil.  The butter - it browns! and turns nutty and fragrant in the oven during the roasting time, and I've never tasted more complex, rich, delicious squash flavor.  I'm also going to tell you about a version of a crustless spinach quiche my friend Emily recommended (which she adapted from a recipe on Smitten Kitchen), and which we ate together with the squash for a very delicious eat-the-rainbow type vegetarian meal.

Butter-Roasted Winter Squash

(this works well with a sturdy squash you can peel and cut into slices, like butternut, i.e. I don't think acorn would be ideal here.  However, delicata would totally work because you can eat the skin, plus it makes pretty flower shaped slices).

1 winter squash, peeled, seeded and sliced somewhere between a 1/4 and 3/8ths inch thick
3 tbsp salted butter, melted
salt and pepper

Preheat the oven to 375.  Brush a sheet pan generously with some of the melted butter using a pastry brush.  Lightly butter both sides of each slice of squash, again with the pastry brush, placing them on the sheet pan as you go.  Sprinkle the tops with salt and pepper.

Roast in the oven for 45 minutes to 1 hour, flipping halfway through.

That's it.  And now...


Spinach Quiche Minus The Hassle of Pastry Making

1 tbsp melted butter
3/4 cup panko bread crumbs
1/4 cup grated parmesan cheese
4 to 6 eggs
salt and pepper
1/4 to 1/3 cup milk or cream if you have it
10 oz package of frozen spinach, thawed and squeezed out very throughly
3/4 to 1 cup frozen peas, thawed (optional)
1 russet potato, microwaved for 3 minutes or until cooked through (optional), peeled and diced
4 to 6 scallions, sliced thin
1 to 1 1/2 cups shredded cheddar or other melty cheese (jack or swiss or PEPPER jack! etc)

Preheat oven to 375 (at this temperature, you'll have to bake it a relatively long time, probably 45 minutes, but I chose to do it at that temperature so it could bake along with the squash; if you're in a hurry and this is all you're baking you can put the oven up to 425 and it will probably only take 20 minutes or so).

Brush a pie plate with the melted butter (ok if the excess pools up in the bottom).  Combine the panko and the parmesan, and sprinkle them into the pie plate, tilting to coat all the buttered surfaces with cheese and breadcrumbs (ok if more sticks to the bottom than to the sides).

In a large bowl beat the eggs with the salt and pepper.  Add the milk or cream (you could also add a little sour cream - amounts are very flexible).  Add the spinach, peas, potato, scallions and cheese, and stir to combine.  Pour into the pie plate, and put it in the oven.  Mine took the better part of 45 minutes to get fully cooked all the way to the middle.  You can just check with the tip of a knife starting at about 35 minutes.

Let it cool a bit before serving.  It's good hot, warm... leftovers were delicious cold, even. 

You could serve the quiche with a super fast fake aioli for a dipping sauce (spanish tortilla style):

Super Fast Fake Aioli

1/2 cup Hellman's/Best Foods Mayonnaise
1 medium to small sized garlic clove, finely minced (I grate mine on a microplane zester)
juice of half a lemon (less even, maybe a quarter)
1/4 extra virgin olive oil
salt and pepper

Mix the mayo, garlic and lemon juice.  Whisk in the oil a little at a time.  Season to taste with salt and pepper.

Sunday, January 29, 2012

N! Y! E!

This post is a little late - but I still wanted to get it up to show you all the things we made for our New Year's Eve party. My basic party philosophy is: 1.) put out lots and lots of delicious food (all over your house so people don't congregate in one place) 2.) pour strong drinks and 3.) bring together engaging, interesting people from all different parts of your life. I guarantee everyone will have a blast...everything else is icing on the cake.

Of course, I love planning parties and half wish it was my profession, but it really was very easy to make a lot of delicious and beautiful food - it's all about taking time to plan your menu and present things in a unique way. We did all appetizers, but there were so many choices that people who were hungrier certainly had many choices to fill their bellies.


Roasted Potatoes with Creme Fraiche, Scallions and Optional Bacon


Poblano Cream Soup Shots (sorry for the spillage!)


Grapefruit Bourbon Punch with Mint Simple Syrup - freeze grapefruit slices for prettier ice cubes


Crostini with Steak, Goat Cheese and Mushrooms


Bloody Mary Shrimp Cocktail (more spills!)


Pork Meatballs in Marinara


Bleu Cheese drizzled with rosemary infused honey


Spiced Almonds


Crostini with Lemon Ricotta, Roasted Butternut Squash and Fried Sage


White Bean, Feta and Sun-Dried Tomato dip - serve with crackers, chips, bread or veggies


Crudites with Homemade Caesar Dip


Unfortunately, I don't have any pictures of our desserts...delicious persimmon puddings with lemon curd and macaroons from our awesome friend Jess and an assortment of cookies (the best chocolate chocolate chip cookies ever, orange thumbprint cookies) and phenomenal lemon cheesecake from Elaine.  A delicious time was had by all.

Monday, January 23, 2012

Transforming Leftover Roast Chicken and Vegetables into a whole other meal


I roasted a chicken the other night, along with the standard root vegetables (carrots, potatoes, turnips, onions, celery, garlic cloves, etc).  It was wonderful (but everyone knows how to do this, I think, so I won't share how I did it, I'm here to talk about the leftovers).  See, the chicken (due to being sustainably raised, and my not wanting to spend a ton of money on meat) was tiny, and after the one dinner for the two of us, there wasn't really a full meal for two left for the next day.  (Also, Axel F doesn't love eating leftovers, particularly).  So to transform what was left into a new and different (and more generous) meal, I took all the meat I could off the bones of what remained of the chicken (half a breast and a thigh), chopped up all the roasted vegetables nice and small (along with some cooked broccoli I had leftover from another meal, and some thawed frozen peas) and threw together a casserole.  It turned into enough food to feed an army (or well, 8 people) generously.  This could be done meaty or vegetarian, with any kind of leftover cooked meat or vegetables that you have on hand (or if you started with drained canned tuna and frozen peas, it's the classic tuna noodle casserole).

It's basically just: cooked pasta or noodles, white sauce (bechamel) and/or cream of mushroom soup, cooked meat and/or vegetables, breadcrumbs.  And it is creamy and rich tasting (without actually packing in much fat), filling and homey, with a nice crunch from the toasty breadcrumbs.  It's what Minnesotans call "hot dish," and I love it.  If you really want to gild the lily (as our parents like to say), you could grate some cheese in before mixing it all together... but I found it plenty rich as is.

You need:
1-3 cups of cooked meat, medium dice
2-4 cups of cooked vegetables, medium dice
1 cup frozen peas, thawed under a bit of cold running water and drained
1 pound of pasta, in some kind of piece type shape - orecchiette, or farfalle, or penne, or even wide egg noodles would be great
a batch of white sauce (recipe below*) PLUS a can/carton of cream of mushroom soup** OR a double batch of white sauce made with extra seasoning***
3-4 slices of white sandwich bread (or really any bread you've got)
3-4 tbsp butter

Grease a 9 by 13 glass baking dish or similar with soft butter and set aside.  Preheat the oven to 375.

Tear up the slices of bread and add to a food processor along with 3 tbsp soft butter and a bit of salt and pepper, and pulse until the bread is in uniform crumbs and the butter is well distributed.

Prepare the white sauce* and combine it with the cream of mushroom soup.  Add enough extra milk if necessary to make the mixture loose enough - it should look about as thick as clam chowder or a spaghetti sauce.  Pour the mixture into a large bowl.

Boil the pasta or noodles in very well salted rapidly boiling water (it should taste as salty as ocean water).  Drain the pasta and add it to the white sauce in the bowl, along with your meat and/or veggies, and mix well to combine.  Taste for seasoning and add salt and pepper if necessary, and thin with more milk or some reserved pasta water if it doesn't seem saucy enough.  Now would be the time to add cheese if you want it (cheddar or even some grated parmesan would be good).  Any other seasonings you like (chopped pickled jalapenos, chopped roasted red pepper, chopped fresh herbs, etc) can be added now.

Pour the mixture into the prepared baking dish and smooth out the top.  Carefully pour on the breadcrumbs, spreading them over the whole surface.  Bake at 375 for 45 minutes to an hour, till things look bubbly and the breadcrumbs turn nice and golden brown.


*WHITE SAUCE (or, bechamel)
2 cups milk
3 tbsp butter
3 tbsp flour
bay leaf
salt and pepper

warm the milk in a saucepan on the stove, or in the microwave, in a microwave safe measuring cup.

In a larger saucepan, melt the butter.  When the foaming subsides, and with a whisk handy, sprinkle in the flour and start whisking vigorously to combine thoroughly and get rid of any bits of dry flour.  Cook this mixture (keeping it moving) for a minute or two over medium heat.  You'll smell that the raw flour scent goes away, and turns buttery and toasty.

Add the warm milk very gradually, little dribbles at a time at first, whisking as you go.  Once milk seems to outnumber the flour in the pan, you can add the rest of the milk all at once, and add the bay leaf.  Whisking constantly (being sure to get into the corners of the pan), cook until the mixture comes to a boil and thickens.  Season to taste with salt and pepper.  (Sometimes it's nice to add nutmeg to this too, especially if you're using, say, leftover cooked dark greens like kale or chard, and leftover italian sausage for the meat! mmmm.)

 **I normally would just make lots of white sauce for something like this, but I happened to have bought (on spec) a carton of condensed cream of portobello mushroom soup at Trader Joes, it seemed like it would be a tasty addition, and lo - it was!

*** if you don't use part cream of mushroom soup, in addition to doubling the amounts for the white sauce, I'd recommend amping up the flavor by adding a finely chopped onion and some garlic to the butter at the beginning, cooking it until soft and translucent but not brown, before adding the flour and continuing with the regular white sauce recipe.


Thursday, January 5, 2012

Mark Bittman Couscous casserole, veggie style

This recipe (from How to Cook Everything) is fairly easy, and the results smell and taste a lot like lasagna (yay!), but without the hassle of boiling/wrangling noodles or the long bake time.  The original recipe calls for sauteed ground meat, which you could do if you want, but the way I made it was all vegetables (plus chickpeas and cheese), and it was very filling and satisfying.  In the original Bittman recipe he implies that you can used cooked leftover... anything in this (meat or vegetable), and I'm inclined to agree.  Also he says it can be assembled up to a day in advance before baking, which is helpful. 

Ingredients:
4 cups of your favorite tomato sauce*
1/4 cup water or veggie stock
2-3 pounds of whatever veggies you like (2-3 pounds uncooked if you're going to roast them for this recipe, or about 3-4 cups of already cooked leftover veggies/beans/etc)
1 roasted pepper, seeded peeled and chopped (optional - I didn't have one, but it seems like it would be good)
1/2 cup couscous (whole wheat or regular) (I think you could substitute fine bulgur or quinoa if you are gluten free, without any adjustment to the recipe except maybe a slight increase in stock/water; or other heartier grains you'd want to par cook first, and maybe measure about 1-1 1/2 cups of cooked grains)
1/2 to 1 cup of cheese (I used feta and parmesan) (amount to taste and dictated by what you have on hand - goat cheese would be fun too I think, but feta and parmesan were a great combination)

First, preheat the oven to 400, and cut up your veggies (if you're not using up already-cooked leftover veggies) into smallish chunks or slices.  I used sliced zucchini and summer squash and a drained can of chickpeas.  You could use things like diced eggplant, winter squash, carrots, peas, any cooked beans, etc.  Whatever you choose, if it needs cooking, cut into small and roughly equal pieces, put it on a big baking sheet, drizzle with oil and salt and pepper, and roast till things start to brown, 10-15 minutes or so.  I think greens might be good in this - you could sautee (or blanch, drain/squeeze out) and chop chard, spinach, or kale and mix it in with the roasted veggies once they're out of the oven.


Heat your tomato sauce along with the stock or water in a large-ish saucepan until bubbling (I maybe used a bit more than 1/4 cup stock).  Stir in the roasted bell pepper if you have it and the couscous, stir, cover, and remove from the heat.  Reduce the oven temperature to 350.


Oil a 2 quart baking dish (not metal), and layer the couscous/tomato mixture alternating with the roasted veggies and cheese, till you fill the dish (if you're using leftover pre cooked vegetables, I'd recommend warming them up a bit before layering them, so they don't slow down the baking.


Bake at 350 for 20-25 minutes until the sauce is bubbling and the cheese is melty.  Cool a bit before serving.  This was great with a green salad on the side.


It also made delicious leftovers (the flavor might even improve!) with a fried egg and sriracha on top.


*easiest tomato sauce I make:
olive oil
1 onion, chopped
as many garlic cloves as you like (4 or so), chopped
a 32 oz can of crushed tomatoes
whatever seasoning you like (basil, oregano, parsley)
salt and pepper

fry the onion and garlic in oil until softened (you could chop a carrot very small for this too if you wanted).  Add the can of tomatoes and a little water if it seems thick.  Add herbs and salt and pepper to taste and simmer over medium low heat for 20 minutes.

EVEN EASIER: Trader Joe's sells 32 oz cans of Marinara Sauce which I was shocked to find is pretty decent tasting.  Actually, they sell several different kinds - look for the kind that has the shortest ingredient list (it's impressively short).

Monday, December 26, 2011

Steamed Whiskey and Marmalade Pudding with Sauce Anglaise


I was put in charge of dessert for Christmas dinner so I gathered a list of Christmasy sounding recipes and presented them to the family for an informal poll. Elaine and Axel F narrowed it down to Frozen Peppermint Bouche de Noel and this one. Upon presenting these two final options to mom and dad I received the response: 'the whiskey one. When we see whiskey, we react.' The whiskey one it was.

This recipe is from last December's issue of Bon Appetit magazine. I was skeptical about whether or not a "steamed pudding" would actually be appetizing...luckily it was not only appetizing but really rich, delicious and special enough for Christmas dinner.


Ingredients:

Sauce:
1 cup whole milk
1 cup heavy cream
1 1/3 cup sugar
6 egg yolks
1 vanilla bean
2 tbs whiskey (I may have added extra!)

Puddings:
1 3/4 cup sugar
2 sticks butter (1 cup), at room temp
3/4 cup citrus marmalade*
Zest of one orange
4 large eggs
2/3 cup whiskey**
1 3/4 cup self rising flour***

Special equipment: 8 3/4 cup ramekins, buttered and floured (do this thoroughly, you'll be sorry otherwise!)

To do:

To make the sauce, whisk together egg yolks, milk, heavy cream, sugar and vanilla bean seeds. The recipe said to discard the vanilla bean itself, but I threw it in to impart some additional flavor. Place over medium heat and stir constantly until the mixture thickens and coats the back of a spoon. The recipe said 9 minutes, I cooked it for more like 12-15. It likely depends on whether your ingredients are cold or at room temperature. I was surprised there was no tempering of the yolks situation but this worked out just fine. I did strain mine at the end to get out some lumpy bits at the bottom of the pan. Once done, transfer sauce to a bowl and put in the refrigerator until cool. This can be done up to 2 days in advance.


For the puddings, beat together the sugar and butter until blended and smooth. Add the marmalade and zest and beat again. Beat in the eggs one at a time, then beat in the whiskey and then the flour until combined. Divide the batter equally among the ramekins. I will admit, I only had 6 ramekins and I definitely filled them too full...if you have the prescribed 8, I think you will have better luck in terms of both cooking time (mine took longer than expected) and portion size (these are so rich and mine were definitely too big).

Cover the ramekins with buttered foil (important!) and place in a rack inside a roasting pan. Add hot water to the roasting pan until it comes halfway up the sides of the ramekins. Bring the water to a gentle boil then reduce heat to medium high and cover with foil. Steam the puddings for 50 minutes or until a knife inserted into the center comes out clean. At some point you will think, "these are never going to cook!!" Do not despair, they will, although you may need to turn up the heat and or add additional hot water to the pan.

Once cooked through, carefully remove the ramekins from the roasting pan, run a knife around the edge and turn out onto a plate. Mine came out fairly easily with a minimum or angst and drama, but next time, I will take better care with my butter and flour in the crevices as the caked did stick a bit around the edges. Top with sauce and serve.


This was like a cross between a pudding and a cake, extremely moist but with a tender cake crumb. The bitterness from the whiskey and marmalade is a perfect balance to the super sweet sauce.


*You can use any kind of citrus marmalade...orange is fine. I used one that I made in my jams class at the BCAE that was made from oranges, lemons and limes.

**I used Jameson, you use what you like.

***You will definitely need to use self rising flour, as there no other leavening in the pudding. If you cant find or don't want to purchase a whole sack of the stuff, you can make it yourself by combining 1 1/4 teaspoons Baking powder and 1/4 teaspoon salt to each cup of flour you need.

Saturday, December 10, 2011

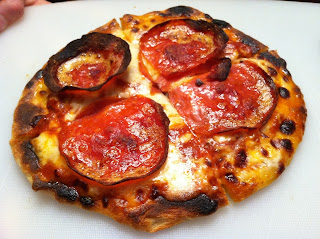
PIZZA

A quick post about a WAY to make pizza, rather than a full on recipe (everyone has their favorite pizza dough recipe, OR a buck for a bag of dough at TJ's is a totally great substitute for making your own).


This method is what Mario Batali suggests as a pizza process in his book Molto Gusto (I've referenced the book here before, you should totally get it - gorgeous recipes, most of them vegetarian, but some meat too, totally terrific!  and great photos, one for every recipe, which is awesome).

Basically, you par cook your dough on the STOVETOP!  You can do many crusts at once and freeze them for super quick pizza making in the future!  You need a nice heavy cast iron skillet (if you don't have one, go to a thrift store near you and buy one for a buck.  Or, go to a kitchen store and buy a new one for 20 bucks.  Read up on how to use and care for them here).

Anyway, you heat a cast iron pan on the stove top over medium heat for several minutes.  Make sure your dough is lovely and rested, soft and at room temperature.  Pat out small rounds of dough (4 oz. if you have a scale - which if you bought a pound of dough at the store means you're dividing your dough into 4 pieces) - just big enough for an individual pizza size, maybe 8-10 inches when it's patted out (however big your cast iron pan is would be a good way to decide this).  Press the dough out (Mario recommends using a mix of flour and semolina to dust your surface, because the semolina gives you a little extra crunch in the final pizza); as you press it out, leave a little rim around the edge, but with the main part as thin as you can possibly make it - in fact, when you think it's thin enough, tell yourself you can get it just a little thinner.

Throw it in the preheated pan and cook it for a few minutes, until lightly brown and dry looking on the underside, with some darker brown spots.  Flip it over and cook for slightly less time, until the dough on the second side is definitely dry with some golden spots.  You can press on any thicker spots at this point to encourage them to cook through.  Remove to a rack or cookie sheet to cool completely.  Continue to do this with all your dough.

The fun thing is, you can make pizzas now, but you can also save some crusts for later - they freeze incredibly well.  Thaw before you use them.


So the actually turning into pizza part I must differ slightly with Mr. Batali, much as it pains me to do so.  His instructions have you top the par cooked crust with your preferred toppings and then slide it under the broiler.  In my home oven, this resulted in amazingly crusty tops, but soggy bottoms!  I don't like that in a pizza.  SO I heated my cast iron griddle (wide and totally flat; if you only have a cast iron skillet with high sides, I'd recommend using an overturned cookie sheet, to make sliding on crusts topped with sauce a cheese easier), and put it in the oven on the top rack under the broiler set on high to preheat, so that I could throw the pizzas on that (I'm afraid the heat of the broiler would kill a pizza stone, can anyone confirm or deny this?  I don't want to test my theory on MY pizza stone) - anyway, the cast iron base provided toasty heat to crisp the underside while the broiler melted the cheese (and browned the salami) and turned the top crust mahogany and crispy like I've never managed before.

Next time I might go so far as to briefly broil the crust UPSIDE DOWN before removing it, putting on the toppings, and sliding it back under the broiler right side up.

A warning he gives is that you really want to top and broil these one at a time - so plan this for the kind of meal where that would work out for you.  You don't want to have a bunch of them sitting with sauce and cheese and what-have-you on top for any length of time before they go under the broiler or the crust will get soggy.  NO TO SOGGY PIZZA!  So the method is, top the crust as fast as you can and broil it!  Eat it!  Top and broil another!  And another!  Axel F and I ate three of these for dinner once and were very full (but not uncomfortably so).  So I'd bank on 1-2 per person.

Friday, December 9, 2011

Hamburgers with Pork Belly and Tomato Jam


Elaine was over and we were making burgers.  And that seemed pretty boring so obviously the only thing to do is to take some left over pork belly (from a DELICIOUS dinner at Vee Vee in Jamaica Plain), fry it up and put it on top.  Diabolical?  Maybe.  Delicious?  Definitely.  So, the next time you have leftover pork belly in the fridge (all the time, right?) consider this.

Make your burgers as you would normally (I just mixed my meat with worcestershire sauce and salted and peppered the patties before cooking).  Fry burgers to your desired doneness (medium rare, obvy) and then quickly fry up your pork belly, just to warm it and give it a little crunch on the outside.  Toast some delicious sourdough, spread on some tomato jam (I make this recipe, so spicy and delicious) and top with burgers and pork belly.

I served these with a super simple salad and celery root which I cubed and roasted with butter, salt and pepper in a 400 degree oven for 45 minutes to an hour until tender and golden brown.