Pages

Showing posts with label Using Leftovers. Show all posts

Friday, December 9, 2011

Hamburgers with Pork Belly and Tomato Jam


Elaine was over and we were making burgers.  And that seemed pretty boring so obviously the only thing to do is to take some left over pork belly (from a DELICIOUS dinner at Vee Vee in Jamaica Plain), fry it up and put it on top.  Diabolical?  Maybe.  Delicious?  Definitely.  So, the next time you have leftover pork belly in the fridge (all the time, right?) consider this.

Make your burgers as you would normally (I just mixed my meat with worcestershire sauce and salted and peppered the patties before cooking).  Fry burgers to your desired doneness (medium rare, obvy) and then quickly fry up your pork belly, just to warm it and give it a little crunch on the outside.  Toast some delicious sourdough, spread on some tomato jam (I make this recipe, so spicy and delicious) and top with burgers and pork belly.

I served these with a super simple salad and celery root which I cubed and roasted with butter, salt and pepper in a 400 degree oven for 45 minutes to an hour until tender and golden brown.

Wednesday, May 25, 2011

Mushroom and Chicken Fake Crepes

You might come home from work and not feel like making dinner. So you might then look in the refrigerator to see what you can make quickly. And then you might see 2 packages of mushrooms languishing there which you bought because they were 3/$5 but who can eat that many mushrooms? And also you see the remains of a whole chicken breast that you roasted with garlic and lemon. You would think at this point you would decide to make something quick and easy like maybe a SALAD with some CHICKEN and MUSHROOMS on it. Or possibly you would instead decide to make CREPES - not really that easy and certainly not quick. What is wrong with me?

Anyway, I called these fake crepes because they don't have any flour in them, they are just eggs and cream. But they cook up like crepes and are terrific with savory fillings. They might be good with sweet stuff although for some reason, I'm not convinced. You try it and let me know. Your imagination is the limit as far as the fillings go - roasted veggies, cheese, spinach, and any various proteins would be great. Here's how I made mine:

Ingredients:
3 eggs
1/4 cup heavy cream
12 oz. mushrooms
1 tbs chopped thyme, or more to taste
1 tbs parsley, or more to taste
s&p
butter
chicken
shredded cheddar cheese (I bet I used a cup total - really, its up to you to decide - which was a fortune Elaine once got in a fortune cookie, so it just goes to show you - IT'S TRUE, it IS up to you to decide.)

Whisk together the eggs and heavy cream and salt/pepper - you can also use whole milk if you prefer. These proportions made me 6 crepes, plus 3 that went awry, so you can adjust as needed. Heat a small non-stick skillet over medium heat and butter the pan - you don't want too much, just a thin layer. Add 2 tablespoons of egg mixture to the pan and swirl to coat the bottom. Cook about 1 minute until it is set and flip using a spatula. It won't need as long on the second side. Slide crepe out of the pan and onto a plate and repeat until your batter is gone.

For my mushrooms, I heated some butter and oil over medium heat and added the mushrooms and salt and pepper to taste. I don't like to mess around a lot with my mushrooms, just leave them alone and they will get nice and nutty and brown. Once they've browned, add chopped thyme and parsley and let the herbs heat through for just a minute and then remove from heat.


To assemble your crepes, lay a single crepe on the counter and top with mushrooms, chicken and shredded cheese. Roll it up and place it in a baking dish. Repeat with the rest of your crepes. Top the whole thing with more cheddar cheese and put in a 400 degree oven for 10-15 minutes until they are warmed through and the cheese on top is melted. Garnish with some fresh chopped tomatoes, or whatever else you like.


Monday, March 28, 2011

squash and potato pizza (with an optional sprinkle of bacon)

Next time you have some squash (maybe from your winter CSA) sitting around malingering, and you don't have anything in mind to do with them and don't feel like eating it right away, you can roast them up and store them in the fridge or freezer, till you're ready to try this, a pizza where mashed squash replaces tomato sauce, and potatoes join the ranks of whatever cheese you have in the house. Any kind of winter squash will work - it was a butternut squash in this case, acorn squash would work too. You could probably use about 2 pounds worth on a large pizza, but you can make do with any amount you might happen to have around.

Amounts on everything are intentionally vague because really any amount of anything here can be made to work.

Squash and Potato Pizza

a batch of your favorite pizza dough (you could use that kind they sell in a bag at the store)
winter squash (1 big, or 2 small)
chopped garlic
chopped parsley
chopped fresh rosemary
salt and pepper
par-cooked* whole small waxy potatoes, sliced thin
extra virgin olive oil
cheese of practically any variety you have on hand (a total of about 2-3 cups shredded will make a nice cheesy layer; cheddar is a great match for the potatoes, ricotta would be fun, and parmigiano would be great for crisping up on the very top)
scallions, sliced
bacon, crumbled (optional)**

Roast the squash in whatever way you prefer (I like a 400 degree oven for an hour, cutting the squash in half, removing the seeds and lightly oiling the cut side before roasting. Our friend Jeremy roasts acorn squash entirely whole until soft, just on a sheet pan, and cuts in and removes the seeds after they're all cooled down, which I suspect imparts an extra squashy flavor and moist texture); this squash-roasting can be done well ahead of time and refrigerated, just be sure to get your squash to room temp or warmer to put on the pizza. After removing the peel (skin?) of the squash, break it down into chunks and place in a bowl. Add garlic, parsley, rosemary, salt and pepper and some extra virgin olive oil, and mash around until it has a sort of paste-like consistency.
In another bowl, toss the sliced potatoes with some olive oil and salt and pepper.

Grate or crumble your cheeses. As you can see, I was using this opportunity to use up the alarming hoards of bits of cheese in our cheese drawer.
We had bits of cheddar, taleggio, queso blanco, gruyere, parmigiano and romano. I used most of the cheese you see here, on this and one other pizza I'm not telling you about (it's not a secret or anything, it's just no big deal, tomato sauce, etc).

Roll or press out your dough onto the oiled pan of your choice - I've been using an 11x17 sheet pan for pizza lately. Oil it generously before fitting the dough in there or it'll stick when you bake it and you'll feel sad. If you have trouble with the dough shrinking back, leave the dough for 20 minutes to rest (if you can) and then it should be more cooperative.

Drizzle a little olive oil onto the dough and then spread on the squash in an even layer. Lay out the sliced potatoes over the whole surface, and sprinkle on your cheeses.
Let the pizza sit in a warm place, like on top of your preheating oven, to allow the dough to rise, about 20 minutes.

Bake at 450 for 15-20 minutes, until the cheeses are all melted and the crust is nice and golden brown. When you get it out of the oven, sprinkle on the sliced scallions and the bacon, if you want it, and then let the pizza cool briefly before slicing it up and eating it.
This was delicious leftover. Actually I ate cold pieces of it for lunch the next few days and it was awesome.

*For quick par-cooking to speed up things like this (or for home fries) I like to wash potatoes and pop them whole into the microwave for 2-3 minutes until they give a little when pressed.

**What I actually had was some leftover bacon wrapped (pecan stuffed) dates from a party, which I chopped up and put on there. While bacon wrapped dates stuffed with pecans are over the top delicious on their own, the pizza would also have been great with regular chopped crispy bacon, or actually no bacon at all would really have also been good, and that way I could have shared it with my vegetarian friends.

Thursday, May 20, 2010

Challenge update: pot pie with the world's best biscuit recipe

As some in our reading public may know, we have been really busy lately... and so many cooking/eating events have come and gone without making it onto the blob. We keep hope alive, and take photos, in case of having time, a little of which I have right now.

I wanted to let everyone know, the challenge has been going really well. Almost all of the weird, semi-abandoned containers of who-knows-what have been rescued from the freezer, and with a couple minor (best not to think about it) exceptions, eaten! I want to share one of these with you.

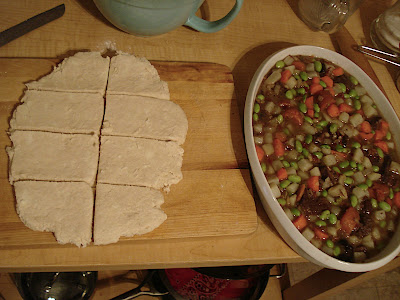
It was some kind of beef stew to begin with, made with onions and carrots, and maybe some red wine. I think I made it (unless our dad gave it to us) but I can't remember when, no idea actually. It was in the freezer in a quart container, but there wasn't enough there to make a good meal for three hungry people. I decided to turn it into a pot pie, since we always have flour for making biscuits, and all that biscuit topping makes for more food for everybody!

So I peeled and cubed up 3 potatoes and 3 carrots, and par boiled them with some edamame in salted water, until tender. I mixed them in with the stew (thus doubling the volume of stew!) and then made my biscuit dough. This is the only baked-good recipe I have memorized (I should be ashamed if I can't remember it, since it has nearly nothing in it) (I love recipes with nearly nothing in them, have you noticed?)

preheat oven to 450

ingredients:
2 cups flour
1 tsp salt
1 tbsp baking powder
1/3 cup vegetable shortening or butter
2/3 cup milk

In a big-ish bowl mix the flour, salt and baking powder. Add the shortening or butter, and using either a fork or a pastry blender, cut the fat into the flour until most of it is broken up, some pieces looking about the size of a pea, but a lot of it can be even smaller. It should look like crumb topping.
Make a well in the center of the flour mixture and pour in the milk. Use your fork to mix it around and get it evenly mixed in. Now here's the step it took me years of biscuit making to really get - even though they say you shouldn't over-work short dough like this, you also shouldn't under work it, did you know that?? So turn out your sort of shaggy looking dough onto a clean countertop and knead it - just maybe 5 times, just till it holds together. Then you roll it out, cut it into the shapes you want (I tend to cut it into squares these days because I hate re-rolling scraps), put them on a baking sheet and bake for about 12 minutes, until golden brown.
For the pot pie, I just laid it on top of the stew in a baking dish, and baked it all together for about 15 minutes. It was good.

Saturday, May 1, 2010

Coconut Delights with Marzipan and Cranberries

That name is a total goof, but I really have no idea what else to call them. We had 8 egg whites in the fridge that were leftover from some things we only need yolks for and Elaine instructed me to make Angel Food Cake. But I don't like Angel Food Cake and anyway the recipe called for 12 egg whites and what is the point of making something to use up your egg whites if you are just generating extra yolks? So then I thought I'd make meringues...but I had too many egg whites for a standard recipe and I don't really like meringues that much either so there was no point in making a double batch, let alone one batch. Then I settled on macaroons. But didn't really look up a recipe. So these did NOT turn out like macaroons at all. But they were delicious, so here is what I did.

I had:
1/2 a package of marzipan
1 15 oz package of sweetened coconut flakes
1 can (no idea how big) of Goya coconut creme
1/2 cup (or so) dried cranberries
8 egg whites
1 pinch salt
1/4 tsp cream of tartar
3/4 cup flour


I diced up the marzipan and mixed it with the coconut flakes, coconut creme and cranberries. Then I whipped up the egg whites in the kitchen aid mixer with a pinch of salt, a 1/4 tsp cream of tartar and 3/4 cup sugar until they formed stiff peaks, similar to when you're making meringues. My thought at this stage was that I would just mix the egg whites with the marzipan/coconut/coconut creme/cranberry mixture and make....cookies? This was a pretty silly idea as the batter was clearly going to be so liquidy from the coconut creme. The egg whites fell completely as soon as I mixed them into the rest of the ingredients and there was no chance of anything close to a cookie. We mixed in about 2/3 cup flour and it was still not able to hold any kind of shape. So, we went back to where it started and poured the batter into the Angel Food Cake pan and baked it at 350 degrees for probably 45 minutes.

It started to get really brown on the outside before the middle was done so we took it out and although we were able to slice it no problem and although it tasted GREAT, is was super gooey, too gooey on the inside. Sort of like coconut candy. Elaine had the brilliant idea of slicing the cake up and baking the slices again, similar to the method used for making biscotti. Good job, Elaine! She baked the slices at 425 degrees for another 30 minutes (she wants me to mention that she baked them on a silicone baking mat and she is not sure what would have happened if she didn't). They came out perfectly golden brown all over, crunchy on the outside and slightly chewy on the inside. These are really sweet, but the cranberries give a nice burst of much needed tartness. Overall, a success.

Saturday, April 3, 2010

CSA Chicken #2 - Just A Little Guy, Roasted on Day Old Bread

On our most recent meat CSA pick up, we recieved:

two small packages of ground beef
a package of country style pork ribs
3 little lamb chops
a huge brick of FRESH BACON (psyched out of my mind about this, and taking suggestions for how to use it)
an itty bitty whole chicken

For sunday dinner last week, I roasted that little tiny chicken up for our dinner.

First I got the neck and giblets out of the cavity. Then I made a brine:

1/2 cup salt
1/2 cup sugar
a lot of water (about 2 quarts), all mixed together in a big bowl

and lowered the chicken into there. Cook's illustrated wants you to refrigerate it at this point, I never do. Our apartment is cold enough. I left it the brine for about 40 minutes, it should have been an hour, if I'd had time.

I had seen a "good thing" in a Martha Stewart about if you have some day old baguette, to use it, torn up on a baking sheet, instead of a rack, for roasting chicken. I had the hard end of a loaf of sourdough bread I had made (I made my own starter! I'll post about it eventually), and this seemed like such a delicious idea and a great frugal way to use up bread that was getting too hard to chew (which is the state the sourdough was in, truth be told).

I took the chicken out of the brine, dried it off, put the torn up bread (it might have equalled maybe a half a baguette) in Jenean's 9x13 pyrex glass baking dish, put the chicken on it breast side down, painted it all over with melted butter and a little olive oil, sprinkled with salt and pepper, and put it in a 400 degree oven for about 30 minutes, at which time I flipped it over, painted that side with melted butter, sprinkled with salt and pepper, and added a little water to the bottom of the pan, because the bread was already toasting up beautifully and I was afraid it might burn if it was too dry down there, as the chicken still had about 30 minutes to go. I turned the oven down to 325 for about 20 minutes, and back up to 450 for the last 10 minutes. This was probably not necessary - you should try just leaving it at 400 the whole time.

When the juices from the thigh ran clear it was done. We ate it
with mashed potaters and roasted broccoli and carrots, and the gorgeous crispy pieces of bread, which had soaked up the juices from the chicken and roasted into sort of giant croutons. There was just enough left for Jenean and Axel to both have some for lunch the next day.

Friday, April 2, 2010

CSA Chicken #1 - Moroccan style with Preserved Lemon

We had two huge chicken leg quarters (i.e. the leg and the thigh attached) left from the February CSA (you can see them in the right hand top corner in the picture there in that post) when we got the March CSA, so I decided to get going on them. They were really surprisingly enormous, considering these are free range chickens we get from Stillman's farm. The way the meat CSA works is, once a month you get 10 pounds of various kinds of meat - you don't get to pick, and it's parceled out. Luckily for us, so far, each little parcel seems to be enough meat for the three of us (Jenean, me and Axel F) to have a meal and sometimes lunch the next day, if we're clever about how we prepare it.

This time I definitely wanted to go Moroccan, because our friends Elena and Matthew had given us a gorgeous jar of preserved lemons they had made themselves (amazing, right??).
I looked up a few recipes to get ideas, but then I just sort of did it, rather than following one particular recipe (especially since I was trying to find ways to use up a bunch of random ingredients in the fridge as per our Challenge).

I cut the chicken up and removed the skin, and any big chunks of fat. I threw the chicken pieces in a big bowl, and added:

2 large onions, chopped into large (1 inch) dice
1 shallot, chopped
4-6 cloves of garlic, minced
1inch piece of ginger, minced
2 cinnamon sticks
6 allspice berries
2 bay leaves
1 tbsp toasted ground cumin
1tsp ground coriander seed
1 tsp cayenne pepper
a couple shakes of ground cinnamon and allspice
a lot of salt and pepper

I tossed that all around, and let it marinate for about an hour.

In my big dutch oven, I melted 3 tablespoons of butter and a couple tablespoons of olive oil. I added the chicken pieces, and cooked them a minute or two on each side (no need to brown them actually) then added in all the onions and spices and everything from the marinade. Then in a stroke of inspiration, I threw in some green olives that had been in the fridge since christmas (really!) and the last third of a jar of sun dried tomato strips (I have no idea how long we've had those - maybe forever). I put the lid on the pot, and put it in a 300 degree oven, for probably 2 hours. I lost track of exactly how long. I was practicing, I was picking Jenean up from work, I don't know.

Anyway - because they were in a low oven, with the lid on the pot the whole time, the chicken and the onions cooked down and released their juices to make their own sauce, and it was lovely. When it came out of the oven and it was time to eat, I added fresh chopped cilantro and two of those gorgeous preserved lemons, chopped up small (I ate some straight - they might be my new favorite snack food). We had it with roasted broccoli and browned butter and almond whole-wheat cous cous (basically follow package directions, but instead of just melting the butter with the water, melt it in the pan with some sliced almonds first, and let them both turn deep golden brown before adding the water; bring it all to a boil, add salt and the cous cous and some golden raisins, if you want, cover and let stand 5 minutes, fluff with a fork, etc).

Tuesday, March 30, 2010

Challenge Chilaquiles - Almost Entirely Leftovers!

We killed so many birds with one stone with this one as far as living up to the challenge of using up things in the freezer. The best part for us was that I started the meat/chile sauce cooking in the slow cooker before I left for the day, and Jenean assembled and baked it at the end of the day. Total teamwork meal. Also - if you didn't know (and we didn't before trying it, though we had a hunch), Chilaquiles is (are?) a delicious and homey dish. It's like Mexico's answer to lasagna.

We thought of making this because of the shocking number of almost-finished bags of tortilla chips that were malingering in our pantry:

and Jenean has this "Beautiful Mexico" cookbook where there is a dreamy recipe for Chilaquiles (which I have been wanting to make for years but never have) that involved boiling a chicken, soaking various kinds of dried chiles, pureeing them up with garlic, etc. We realized it could work, even with the Challenge, because we had in the freezer:

some country style pork ribs
half a container of roasted chopped green chiles
and a few remaining tablespoons of chipotle in adobo sauce (I swear, I opened that can 2 years ago, and have been chipping off a little at a time for recipes ever since)
some stock
some chopped tomatoes and onions (really! Just sitting in the freezer, I have no idea why)
leftover salvadoran crema that needed to get used up somehow

So - I fried the pork in a frying pan, then moved it to the slow cooker. Into the frying pan I added some chopped garlic, a chopped onion and some cumin and chili powder, and some salt and pepper and the two kinds of chiles from the freezer (green anaheims, I think, and the chipotles with all the remaining adobo). I added stock, and brought it to a boil, and then blended that up in the blender, then added it to the slow cooker. Then I added the mysterious chopped tomato stuff to the frying pan to heat up, and a little more stock, and some more spices, and once that was hot, whirred it up in the blender and added it to the slow cooker. 7 hours on low.

When Jenean got home, well - I'll let her take it from here.


Hi!! When I got home, I simply layered tortilla chips, delicious chile/pork mixture, cheese, tortilla chips, delicious chile/pork mixture, cheese - 3 total layers. And I topped it off with lots of cheese and the crema Elaine mentioned earlier. Popped it in a 375 degree oven for 20 minutes and PRESTO!


Totally declicious and everything I want in a Mexican dish - hot and smoky from the chiles, tender pork, lots of corn flavor from the tortilla chips and of course the best part, we used up all those silly bags of chips hanging around. So happy not to see those in our pantry anymore!

Sunday, March 28, 2010

Clementine Muffins, or Morning Sunshine Muffins

Saying Clementine Muffins gets the job done - you know what you're eating. Morning Sunshine Muffins (Jenean's idea) is much more evocative of the lovely experience you will have while eating them.

Have you ever bought a big box or bag of clementines, and at first it is a delight, you are eating three a day and loving every bite, but by the time you're about two thirds of the way through, you are clementined out, and some of them are starting to go bad, and they begin to create anxiety in your household? That's where we were on Thursday evening. So we googled around a bit for ideas for what to do with clementines in a cooked capacity.

We found this recipe, at the beautiful blog smitten, which I believe is originally (or possibly only most famously) Nigella Lawson's. It calls for boiling several clementines in their skins (go look at smitten's beautiful photos of that process, I failed to take any) for 2 or sometimes 3 hours. I saw another recipe on orangette that was very similar, but used an orange and a lemon, and only boiled them for 30 minutes... Anyway - Friday night rolled around, I was all alone in the house and feeling anxious about the clementines, so I set them to boil, and turned them off after 30 minutes. Then Jenean got home and reminded me of the 3 hours in the other recipe, so we added more water and turned the heat back on... and we went and ate dinner, and watched some tv... and we forgot about those clementines. Not till a mysterious, possibly corn-dog-type smell began to waft from the kitchen did we realize what was happening - all the water had boiled off, and the bottom of the pan of clementines was scorching. Quel horreur. We felt terrible. What a waste of what we had thought was a process to SAVE those clementines from going to waste! Dad would be so mad!

We poured in a bunch of water, and joked about burnt sugar clementine cake, and Jenean went to bed. After a little while, I thought it couldn't hurt to at least take the next step, which is to drain the boiled clementines and grind them up, skin and all, in the food processor. Weirdly, the burned bits remained large and separate, and the orange clementine-y bits ground up into a pretty, dark orange paste. I pushed it through a mesh strainer to catch out all the black burned pieces, and sheepishly put it in the fridge.

The next day I decided the Clementine cake recipe, though thrilling, was not what was called for, considering it calls for expensive things like 3 cups of blanched almonds. I wasn't wasting all those nice nuts on burned clementines. So I modified the basic muffin recipe from the Joy of Cooking (not the old one, and not the newest one... the in-between one), and by George, they came out really really good! I mean, I'm going to make these all the time type good! They have such a nice round citrus flavor, without having to grate zest, or squeeze juice, or any of that, and they're really moist. You want to make these. And so without further ado, the recipe for...


Clementine AKA Morning Sunshine Muffins!

Boil 5 clementines in their skins (after removing any stickers, stems, etc and washing), in plenty of water for 1 hour (I really think that's enough). Try not to forget about them and burn them, but no big deal if you do!

Drain, and allow them to cool.  Cut into them to check for seeds, then grind them up into a paste in the food processor. For me this yielded about 1 cup, and it had the consistency of sour cream (up to this point can happen at least a day in advance, if not a lot more).
Have a 12 cup muffin tin ready, lined with paper liners, or just grease it up. Preheat your oven to 400 degrees.

Measure out 3/4 cup of the clementine puree into a medium sized bowl and add and whisk together with:

2 eggs
1/4 cup milk
2/3 cup sugar

6 tbsp melted butter (or 4 tbsp butter and 2 tbsp oil)
1 tsp vanilla

in a large bowl meanwhile, whisk or sift together:

1 cup all purpose flour
1 cup whole wheat pastry flour (if you don't have it, just do all A-P flour, I wouldn't sub regular whole wheat flour here)
1 tbsp baking powder
1 tsp salt

Make a well in the middle of the dry ingredients, pour in the wet ones, and as the Joy of Cooking says, "mix together with a few light strokes just until the dry ingredients are moistened. Do not overmix; the batter should not be smooth." That's just so well said, I had to quote. Anyway, parcel out the batter into the cups, it should come almost to the top of the cup, when they bake the make nice domed tops. These took my oven about 21 minutes to bake... the recipe says to start checking after 12-15 minutes. You'll be able to see they're done when they're fully dry on top, even in the little cracks. Toothpick test them to make sure, and cool on wire racks.

Tuesday, March 16, 2010

Challenge

We've challenged ourselves to eat everything in the fridge, and everything in the pantry before stocking up again, because this is getting ridiculous:

I always envy people who are able shop and eat one week at a time and use every single thing they buy and make, so maybe this is our chance to use it all up and start from scratch. Good luck to us.

Saturday, March 13, 2010

quasi indian friday night dinner

Our lovely friend Emily came over for dinner on friday. We've had two small pumpkins sitting on the windowsill since Halloween, if you can believe it, so I decided earlier in the week to finally do something with them for friday dinner. I remembered a recipe our CSA farmers sent home in a newsletter late in the season last year - chunks of winter squash, roasted in the oven with butter and curry powder, with chunks of apple added later on in the cooking.

Sadly, though both little pumpkins LOOKED good still... their pretty outsides hid a dark secret - only about one quarter of one of them was still usable. Luckily the Hi-Lo sells chunks of some kind of giant squash, so I got a couple of those. We also had some collard greens in the house, so I thought I'd get some tofu and make a kind of fake saag paneer with them.

Some baked brown rice (I added toasted cumin and ground allspice to this batch), and some homemade naan seemed like good a way to round things out... plus Emily brought all the fixings for, and made, some cucumber raita.

The squash (wish I had a picture for right here):
I had probably 2 pounds of squash, cut into cubes, and
2 onions, cut into chunks
mixed up in a big bowl with oil, and a curry powder mix I had made a while back - the usual things like turmeric, coriander, cumin, allspice, cayenne, a little cardamom, and I think a little fennel and cinnamon (it was Sri Lankan style, sort of). I also added a lot of salt and pepper, and some garlic powder.
I poured it all on an oiled baking sheet, covered it with another baking sheet (didn't feel like wrangling a bunch of foil), and put it in the 375 degree oven where the brown rice was already baking. After about 25 minutes I took the top sheet off, and added 3 small apples I peeled and diced, and let it stay in there another 30 minutes or... more. It turned out really tender, and sweet but savory.

The greens (that is, the fake saag paneer):
I sort of made this up as I went along. I put a big chunk of ginger, rough chopped, and 6 or so cloves of garlic rough chopped, and some toasted cumin seeds in the food processor, till it was all ground up.
I added about half the collards (I had 2 pounds total) to the food processor, and let it go till it was ground way down - it looked like a rough pesto.
I fried the cubed tofu, seasoned with salt and pepper, in a good amount of oil in a big frying pan. After I took the tofu out of the pan I added in the ground-up ginger garlic and collards mixture and let it fry up, with some salt and pepper. Then I added a bunch of water, more than a cup, but just a little at a time - I just kept adding water until it looked like a sauce. Meanwhile I put the rest of the collards in a microwave safe bowl, poured in some water, covered with plastic wrap, and microwaved it for two minutes. Then I added it all into the chopped collards in the frying pan, put a lid on it, and let it all bubble together on low heat for a while.
When it was time to eat it, I added some salvadoran crema I got at the Hi-Lo (it's kind of like sour cream or creme fraiche, it turns out! Only, a little cheesier and very salty - Emily warned me it goes bad fast so I'll have to think up something to do with the rest soon), maybe a half a cup, or more, and stirred in the tofu. It turned out better than I expected - in fact I personally felt it was more delicious than the average saag paneer - the collards gave it a little dark-greeny-bitterness that I really liked, better than spinach. I think in the future I might grind all the greens down in the food processor instead of just half of them (then i could skip the separate microwave steaming step). Also next time, I might buy some of the queso para freir they sell at the Hi-Lo, seems like it would be a lot like paneer.

The Naan (this one turned out mitten shaped!):
I used this recipe for naan, sort of. The only thing is that I've been growing a sourdough starter, lately, and had some I had to discard (I'll explain when I post about the starter, some other time), so I had to fudge some of the details. We did use the cooking method (Emily and Jenean spearheaded the naan baking) - which is to roll balls of it out nice and thin and throw it on a very hot stove top grill pan (ours it cast iron, which gets really hot), and flip it when it gets bubbly to cook the other side. Once they were done we brushed them with melted butter which I had put some chopped garlic in. They turned out good - tender and chewy, and crispy on the edges.

The Raita:
Emily brought an english cucumber, toasted ground cumin, yogurt, fresh mint and a lemon. She grated about 2/3 of the cucumber and chopped the mint, and mixed it all up with the juice of half the lemon, some cumin, and salt and pepper. It was so fresh and perky.

what I did with some of the leftovers (indian calzone?):
Emily wisely shut down the naan baking operation when we had 8 of them made, since there were only 3 of us eating. That left me with a pretty big chunk of naan dough sitting in the fridge waiting to get baked. Over the last few days we've been eating all this stuff for meals, so there was just a little bit of the collards left. I rolled out a little piece of it into a thin circle, put last of the collards on (probably just a 1/2 cup), pinched the edges shut, put it on an oiled pie plate, drizzled with a little more olive oil, sprinkled with salt, poked a couple holes in the top, and baked it at 450 for about 15 minutes. It was seriously good.

Saturday, March 6, 2010

Friday part 3 - Squash Sesame Noodles with Fried Tofu

Ok is anyone still with me? Friday was a big day for cooking, it just turned out that way.

Not long after I finished the pretzels, it was getting to be dinner time! A while back, Jenean made a garlicky puree of this big squash we had - the squash itself had a really dense, dry texture, making a very thick puree (she roasted it first, then put it in the food processor). Because it was so thick, she didn't end up needing all of it for her recipe (a yummy baked penne with ricotta, the squash puree and mushrooms), so we had some in the fridge, waiting for someone to need it.

Meanwhile, I was sending my friend Lettuce (code name from 1st grade has finally come in handy!) some fast and easy Mark Bittman recipes I've saved but never made... and realized I could make this one with the leftover sqaush. My favorite thing about Mark Bittman recipes is that once you get the idea, you don't actually have to look at the recipe [sheepish foot shuffling and shrugging]. The idea I got from this one was to make sesame noodles (like, the kind where the main ingredient is peanut butter, plus things like toasted sesame oil, garlic, ginger, soy sauce, etc.) with pureed roasted squash in it. So here's what I did:

In a blender I whirred up about a tablespoon of chopped ginger with a little rice wine vinegar and some water, maybe 1/2 a cup, trying to break up the ginger.
Then I added some of Jenean's squash puree, maybe 2 cups. It was already really garlicky, otherwise I would have added some fresh chopped garlic along with the ginger.
It was super thick so I added some water.
Then some natural style peanut butter - maybe 1/2 cup, it was all I had left, might have put more if I had more...
Then some toasted sesame oil (a tablespoon or more), soy sauce, and a little more water till it was sauce consistency. It was really tasty just like this - sweet, salty, nutty, gingery, garlicky and... squashy.
Then I threw the pasta in the boiling water - we had some whole grain pasta which seemed like a good match for the sauce.

Then I cubed up my tofu after dutifully drying it off, 1 inch cubes.
In a really hot pan, I put in some olive oil and laid the tofu in all careful like.
I chopped up some more ginger, because I was worrying things weren't gingery enough.
I'll admit it - flipped those little cubes of tofu one at a time. There were 24 of them, I counted. Once they were flipped I threw in the ginger, tossed it all around, drizzled in some soy sauce.

I let the pasta cook past the al dente stage - that's how Cook's Illustrated says to do it, let it get nice and soft - then it's good hot OR cold. I drained it (saving some of the cooking water) and threw it back in the pan and tossed it with some olive oil and some more toasted sesame oil (I can basically never get enough of this stuff), then poured in the squash sauce, some of the pasta water till it was nice and loose looking, and then threw in the fried tofu and some sliced scallions. It sure turned out orange. I think we got a lot of beta carotene up in there. Jenean and Axel F cleaned their plates.

Friday, March 5, 2010

Friday part 1 - Sick Day Freezer Soup

Friday was a big day, wow. Fridays are the day I don't do any teaching, so it's my day to... you thought I was going to say cook all day, didn't you? Actually no! It's the day I should be practicing all day. Truly, I did get a fair amount of work done at the piano, 3 or (maybe) 4 hours. Could have been worse. But it could also have been better! But you can't cry over spilled milk.

Jenean was so so sick, and though she almost never lets herself stay home sick, she did stay home Friday, thank God. So since you feed a cold (right? and starve a fever?), I made her some stuff.

For breakfast, a soft boiled egg on toast. Only, I didn't read through the whole recipe for soft boiling, and ended up over cooking it. I was "using" a recipe from
Cooking for Engineers, but here's a hint for all of us, You Guys - something I struggle with pretty severely myself - when you're making something from a recipe, read the whole recipe first. Like, the WHOLE recipe. Suffice it to say, I over cooked it. Jenean was nice enough not to complain.

Then I went and practiced for a while. Then I made chicken noodle soup (no meat, just broth). We had in the freezer a big tub of chicken stock we made a few weeks ago, and also in the freezer, a zipper bag of collected fresh pasta bits leftover from the three times I've made pasta (Axel F gave me the PASTA ROLLER ATTACHMENT for my kitchenaid for Christmas, I am a lucky girl). I felt foolishly frugal doing it at the time, but when there were small unshapely ends of pasta sheets, I just started throwing them in the bag in the freezer, for a future unknown use. And here it was today! I:

boiled the stock (maybe a quart?),
threw in a diced onion and two sliced up carrots,
added a little crushed red pepper, black pepper, and not quite enough salt (oops),
and when the carrots were soft, I threw in a couple handfuls of the still frozen pasta scraps.
those cooked up fast, got nice and plump and floaty.
I threw in some minced parsley, and it was sick day freezer soup lunch!


I'm gonna stop here - there are a couple more things to tell you about (teaser: soft pretzels and squash sesame noodles!), but it seems like overkill to put it all in one post.