Pages

Thursday, March 11, 2010

Homemade EGGS!

Look at these little beauties:

I have two adult students who are a married couple, and they happen to live in a town north of here where keeping your own chickens is legal. They got a bunch of chicks back in November sometime, and since I go to their house for their lessons, I've been able to get updates on them weekly. They have built the chickens a beautiful heated coop, and have given them names like Henry, Joanne, Ashley and Halloween. Actually, the truth about Henry is that he is no longer with us - he was beating up on Joanne so badly that the family had to step in. After a few failed attempts, they finally succeeded in... killing him, and ate him for dinner.


But that's not what this post is about! It's about the adorable little eggs the hens are finally laying! Here is a photo of them with a regular sized supermarket egg, for scale.
Three of them made a nice serving. Their shells were surprisingly hard - much harder than supermarket egg shells. They were really delicious - creamy bright yellow yolks. We just fried them up in butter with the last of the CSA ham steak.
Also surprising is how beautiful all the chickens are - there are almost no two alike in the... herd? is that what you say with chickens? Oh, flock. Right. Some are huge and black and white with red wattles, and some are golden colored with tons of feathers around their legs, making them look like they're wearing bell bottoms. They're pretty adorable, actually. But that's not to say I'm planning to stop eating chicken. I would have eaten Henry, had I been invited to dinner that night, with all due respect to him.

Anyway, according to the family, they're getting about 6 eggs per day now, and have to brave rooster attacks to get into the coop to get them. It's really fun, I hope I can keep chickens someday. I'll try to take pictures of them next week to post here.

Granola

I've been making huge batches of granola lately which we all dip into for a quick breakfast option. There are so many different recipes out there that it really comes down to using the ingredients you enjoy the most - I mean, being in control is one of the best things about cooking at home. Plus, store bought granola tends to be so full of sugar and fat - you can control all these things when you make your own.

Generally, all granolas start with oats, have one or more nuts/seed ingredients, some dried fruit, and then something to bind everything together. Here's what I put in mine today:
- 3 cups rolled oats (not instant)
- 1 cup unsweetened coconut flakes
- 1 cup pecans
- 1/2 cup wheat germ
- 1/2 cup fruit juice (new addition, usually it is 1/4 cup brown sugar but wanted to try this today)
- 1/2 cup olive oil
- 1/2 cup maple syrup
- 1/2 cup dried cranberries (I would prefer these be cherries, but apparently I cannot read labels so cranberries it is!)

Combine oats, coconut, pecans and wheat germ in a large bowl. Over medium heat, I combined the juice and maple syrup. I thought maybe it would all thicken up and it did a little but obviously the syrup thinned down so not really sure what the net result was. Anyway! I poured the juice/syrup mixture and the olive oil over the dry ingredients and mixed to coat. Spread this mixture on a baking sheet in one even layer and pop in a 300 degree oven. Total cooking time is 40 minutes, but you will want to stir it every 10 minutes. Incorporate the cranberries only for the last 10 minutes of cooking. Allow the granola to cool on the baking sheet before storing in an airtight container.

This is great with milk, soy milk, yogurt and would also be awesome on ice cream or stuffed inside some apples for baking.

I love making this stuff because you can get really creative - some other things to add:
- sunflower seeds
- pumpkin seeds
- walnuts
- almonds
- flax seeds
- any type of dried fruit (I may make a tropical version for the summer time with dried papaya or mango to go with the coconut)
- cinnamon
- vanilla

The possibilities are endless. Go do it.

Tuesday, March 9, 2010

Steak Frites or Steak and Freets

To me, Sunday night always feels like a great night for a big homey, hearty meal. With plenty of time to plan and cook during the day, it gives a little more time to make something you might not normally have time for. This Sunday it was Steak Frites. We decided to use up the chuck steak included in this month's CSA share and make some real Frenchy type Frites. FREEEETS. Sorry, I haven't been able to stop saying it since Sunday.

Fries
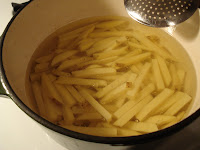
We used a Cook's Illustrated method to make the fries (sounds so awful to call them fries) and winged it on the steak. Elaine cut some Yukon gold potatoes into planks and instead of heating the oil first, she put the fries into the cold oil and let everything come to a boil together. Cook's tested this and claims that the potatoes actually absorb less oil. Healthy fries, my dream come true! Well, not exactly but we can pretend every once in a while. Once the potatoes come to a boil, we let them boil along for 15 minutes and then stirred them to loosen any from the bottom of the pot (preferably a Dutch oven). We cooked them for 5-10 minutes more until golden, drained on paper towels and sprinkled with salt immediately.

Mushrooms - No, not that kind
In the meantime, I sauteed mushrooms. I'm sure you all know that to properly sautee a
mushroom, you must never introduce liquid into the situation. Clean your mushies with a paper towel only, no water! I sliced them, heated a pan until screaming hot, added olive oil and tossed in the mushrooms. Do you know what you do then to attain a perfectly golden brown, nutty and delicious mushroom? Do you? You do nothing. You add salt and pepper and you do not touch. Not until they are beautifully caramely brown on one side. Then you can flip, but do not stir. I guarantee you will have perfect mushrooms every time.

Steak
After removing the mushrooms from the pan, I added my salt and peppered steak to a little more olive oil and butter in the same pan. Seared on high heat for about 4 minutes and again, didn't touch. Flipped once, 4 minutes on the other side and presto, beautiful medium rare steak. I removed the steak and covered with foil to rest - very important step to allow all the juiced to run back into the meat - cut it without doing this and you will have a lot of meat juice on your cutting board and a very tough piece of meat.

Sauce
The sauce was sort of an after thought, I had originally intended to just top the steak with the mushrooms, but then this beautiful sauce just materialized before us. I sauteed a shallot and some garlic in the same pan that I used for the steak and mushrooms (with a little extra butter, for flavor). Then Elaine said, "do you want some brandy?" and I said "why yes, yes I do." We added the brandy in stages but I think it ended up begin about 1/2 - 3/4 cup. This is traditional for Steak au Poivre sauce so my mind automatically went to adding cream, which we didn't have. But we did have sour cream, so that went in, probably 1/4 - 1/2 cup along with some salt, all over medium high head until everything had meshed together to become a delicious, mushroomy, cream batch of loveliness.


We sliced the steak and served the mushroom sauce over top, with the magical crispy frites on the side, along with roasted broccoli and a lovely salad. Great beginning to the week. Hope its a good one for all of you as well!

Saturday, March 6, 2010

Friday part 3 - Squash Sesame Noodles with Fried Tofu

Ok is anyone still with me? Friday was a big day for cooking, it just turned out that way.

Not long after I finished the pretzels, it was getting to be dinner time! A while back, Jenean made a garlicky puree of this big squash we had - the squash itself had a really dense, dry texture, making a very thick puree (she roasted it first, then put it in the food processor). Because it was so thick, she didn't end up needing all of it for her recipe (a yummy baked penne with ricotta, the squash puree and mushrooms), so we had some in the fridge, waiting for someone to need it.

Meanwhile, I was sending my friend Lettuce (code name from 1st grade has finally come in handy!) some fast and easy Mark Bittman recipes I've saved but never made... and realized I could make this one with the leftover sqaush. My favorite thing about Mark Bittman recipes is that once you get the idea, you don't actually have to look at the recipe [sheepish foot shuffling and shrugging]. The idea I got from this one was to make sesame noodles (like, the kind where the main ingredient is peanut butter, plus things like toasted sesame oil, garlic, ginger, soy sauce, etc.) with pureed roasted squash in it. So here's what I did:

In a blender I whirred up about a tablespoon of chopped ginger with a little rice wine vinegar and some water, maybe 1/2 a cup, trying to break up the ginger.
Then I added some of Jenean's squash puree, maybe 2 cups. It was already really garlicky, otherwise I would have added some fresh chopped garlic along with the ginger.
It was super thick so I added some water.
Then some natural style peanut butter - maybe 1/2 cup, it was all I had left, might have put more if I had more...
Then some toasted sesame oil (a tablespoon or more), soy sauce, and a little more water till it was sauce consistency. It was really tasty just like this - sweet, salty, nutty, gingery, garlicky and... squashy.
Then I threw the pasta in the boiling water - we had some whole grain pasta which seemed like a good match for the sauce.

Then I cubed up my tofu after dutifully drying it off, 1 inch cubes.
In a really hot pan, I put in some olive oil and laid the tofu in all careful like.
I chopped up some more ginger, because I was worrying things weren't gingery enough.
I'll admit it - flipped those little cubes of tofu one at a time. There were 24 of them, I counted. Once they were flipped I threw in the ginger, tossed it all around, drizzled in some soy sauce.

I let the pasta cook past the al dente stage - that's how Cook's Illustrated says to do it, let it get nice and soft - then it's good hot OR cold. I drained it (saving some of the cooking water) and threw it back in the pan and tossed it with some olive oil and some more toasted sesame oil (I can basically never get enough of this stuff), then poured in the squash sauce, some of the pasta water till it was nice and loose looking, and then threw in the fried tofu and some sliced scallions. It sure turned out orange. I think we got a lot of beta carotene up in there. Jenean and Axel F cleaned their plates.

Friday, March 5, 2010

Friday part 2 - Soft Pretzels Are Just Dreamy

You Guys.

I've been dreaming of soft pretzels for weeks. I think it started when I saw an article about them in the Times or something. They seem like the world's best snack, somehow. Very grab-able, easy to eat in one hand while driving, for example.

So just before I made the soup for Jenean, I started the dough for the pretzels, I used (and slightly modified) a recipe that claimed to be
just like Aunt Annies. It looked a lot like the Alton Brown recipe, minus the boiling water step.

I mixed:
1 1/2 cups warm water
1 1/4 tsp yeast

and stirred to dissolve it, then mixed in:
2 tbsp brown sugar
1 1/4 tsp salt


Then the recipe called for 1 cup bread flour and 2 cups all purpose flour. I didn't have any bread flour, so I used this "white whole wheat" flour I got at Trader Joe's the other day.

I fired up the kitchenaid and sent that dough on its way. (My sister rallied my parents and my grandma to join her in giving me that kitchenaid for my 30th birthday, and it remains one of the awesomest gifts I have ever gotten. Thank you Neanie).

Part way through the process it seemed like the dough was too stiff for the machine, so I took it out and did some kneading by hand. There's a funny story about that, but I feel like this is going on too long already so I'll skip it. I left it to rise for an hour near the radiator which was actually warm, unlike every other day (meanwhile I practiced!), punched it down, let it rise another half hour.
Then I divided the dough into 12 pieces, and one at a time rolled them into snakes (felt like 2nd grade art class!), very long and thin (almost twice as long as this very blurry picture shows), then pulled the ends up into a U shape, crossed them over each other and pressed the ends into the bottom of the U.

Then as per the Aunt Annie's recipe, I filled a slightly-bigger-than-pretzel-sized bowl with warm water and dissolved a couple tablespoons of baking soda in it. That recipe just had you dip the formed pretzels in the baking soda water before putting them on a baking sheet.

After I did the first 6 pretzels that way, I decided to go a little test-kitchen-y and try Alton Brown's method with the remaining six, which is to bring that baking soda water to a boil, and boil each pretzel for 30 seconds, then drain on a rack, before putting them on the baking sheet to rise for another 15 minutes.

During this whole process, my cat Oz was loitering around the kitchen hopefully, thinking I was in there to give him dinner (note my grammatically correct use of the word hopefully. I include this aside as a loving tribute to my grandma, who felt passionately about many things, high on that list being the proper use of the word hopefully). Anyway, Oz had to wait.

After all the pretzels were formed, variously dipped or boiled, and briefly risen, I brushed them with melted butter and baked them in a 450 degree oven for 12 minutes, turning the baking sheets 6 minutes in, and swapping the two sheets top to bottom, too.
The verdict on boiling versus dipping? Boiling. It wasn't that fussy a process, actually, and the boiled ones had a better texture and browned up prettier.

When they came out of the oven I brushed them with more butter, sprinkled them with kosher salt, and then finally ate one! And man, it was really good. (Don't worry, I fed the cat eventually).
Part 3 (the final part, don't worry) of Friday's cooking and eating coming soon: Squash Sesame Noodles with fried tofu.

Friday part 1 - Sick Day Freezer Soup

Friday was a big day, wow. Fridays are the day I don't do any teaching, so it's my day to... you thought I was going to say cook all day, didn't you? Actually no! It's the day I should be practicing all day. Truly, I did get a fair amount of work done at the piano, 3 or (maybe) 4 hours. Could have been worse. But it could also have been better! But you can't cry over spilled milk.

Jenean was so so sick, and though she almost never lets herself stay home sick, she did stay home Friday, thank God. So since you feed a cold (right? and starve a fever?), I made her some stuff.

For breakfast, a soft boiled egg on toast. Only, I didn't read through the whole recipe for soft boiling, and ended up over cooking it. I was "using" a recipe from
Cooking for Engineers, but here's a hint for all of us, You Guys - something I struggle with pretty severely myself - when you're making something from a recipe, read the whole recipe first. Like, the WHOLE recipe. Suffice it to say, I over cooked it. Jenean was nice enough not to complain.

Then I went and practiced for a while. Then I made chicken noodle soup (no meat, just broth). We had in the freezer a big tub of chicken stock we made a few weeks ago, and also in the freezer, a zipper bag of collected fresh pasta bits leftover from the three times I've made pasta (Axel F gave me the PASTA ROLLER ATTACHMENT for my kitchenaid for Christmas, I am a lucky girl). I felt foolishly frugal doing it at the time, but when there were small unshapely ends of pasta sheets, I just started throwing them in the bag in the freezer, for a future unknown use. And here it was today! I:

boiled the stock (maybe a quart?),
threw in a diced onion and two sliced up carrots,
added a little crushed red pepper, black pepper, and not quite enough salt (oops),
and when the carrots were soft, I threw in a couple handfuls of the still frozen pasta scraps.
those cooked up fast, got nice and plump and floaty.
I threw in some minced parsley, and it was sick day freezer soup lunch!


I'm gonna stop here - there are a couple more things to tell you about (teaser: soft pretzels and squash sesame noodles!), but it seems like overkill to put it all in one post.


Tuesday, March 2, 2010

Chipotle Pork Cheeseburgers - Say What?!?


Last night, in honor of National Pig Day (Monday) we made cheeseburgers with the ground pork we got in our CSA. Chipotle Cheeseburgers, no less and boy were they delicioso. The burgers were juicy and tender, almost buttery and the spicy smokiness of the chipotle balanced nicely with the sweetness of the meat. Here's what we had on hand:

Ground pork
Chipotle in adobo
Garlic
Cheddar cheese
Whole wheat English muffins
Cilantro
Scallions

Lainie, per my instruction (ha ha), chopped up a chipotle and added that along with 1 tsp adobo sauce and 2 cloves garlic to our lovely CSA ground pork and mixed it up good. Once formed into patties, we fried them up in some olive oil, layering on the cheddar cheese after we flipped them. We covered and let the cheese melt until the burger was just cooked through. We ate them on toasted whole wheat English muffins with mayo and mustard and some chopped cilantro and scallion. Probably took 15 minutes total and was totally delicious. I can't wait to make these when avocados are in season as that will really take them to the next level.

Elaine made a Tex-Mex inspired casserole on Friday which included brown rice, refried black beans, spinach, corn, salsa, green chiles and shredded cheese. We have plenty leftover and this was the perfect accompaniment for our burgers.

I'm a happy camper.